Body
At the end of a course you need to post student grades to CampS. Midterm grades can also be posted.
Contents:
Assigning Grades
- Log on to CampS using your regular username and password.
- From the top menu bar, click Main Menu.
- Click Self Service.
- Click Faculty Center.
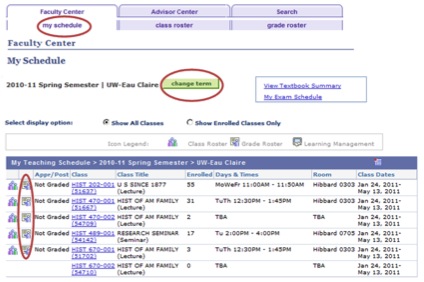
- Select the My Schedule menu option to grade the desired class.
- Change the term to the correct grading term if necessary. Your personalized Faculty Center page will appear, along with your teaching schedule for the current semester.
NOTE: The system simply remembers the last term you've viewed.
- Click on the Grade Roster
 icon to the left of the class you wish to work with.
HINT: The class link simply takes you to a detailed description of the class.
Below is an image showing the previous steps:

- Make sure the class meeting information is correct. Click Change Class to choose a different class.
- In the Display Options box from the Grade Roster Type pull-down menu, select Mid-Term Grade or Final Grade.
NOTE: If both types are available, Final Grade will be the default.
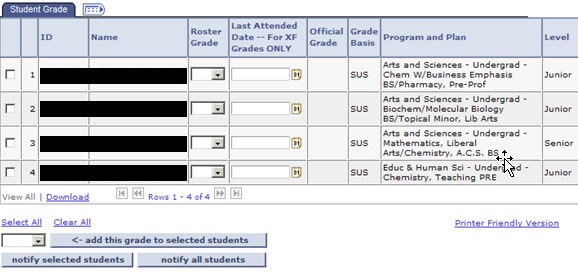
The Student Grade page appears.

- To assign a grade to a student, click on their Roster Grade pull-down menu.
The appropriate grading basis appears in the dropdown list.
- Select the appropriate grade.
NOTES: Students no longer attending your class should be assigned a grade of XF.
Final Grades only with XF grade: Type the last date they came to class in the Last Date Attended text box. This is done to meet UW-Eau Claire's Federal Financial Aid statutes involving students who unofficially withdraw from the university. Repeat for each student.
- If you are not able to grade the entire class, click Save and return later to finish grading.
- See the next section to submit the grades and permit the Registrar's Office to post to student transcripts.
Submitting Grades
When you have finished entering grades,
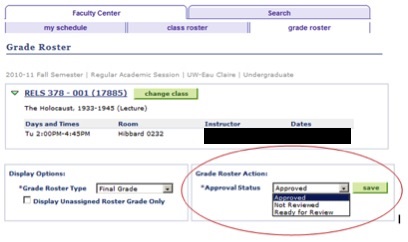
- Student grades will not be posted until they are approved. After you have graded all students, select Approved from the Approval Status pull-down menu.
- Click Save.

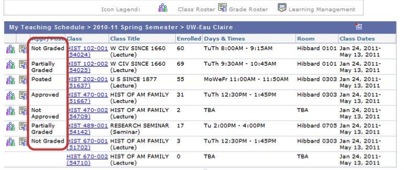
- Once you set your grades to Approved status, a nightly process will post the grades to student transcripts. Throughout the grading process, grade rosters may appear on the My Schedule menu with the following statuses:
- Not Graded: No grades have been recorded.
- Partially Graded: Some grades have been recorded, but not all.
- Not approved: All grades have been assigned, but roster needs to be put into Approved status (see above).
- Approved: Grade roster has been successfully graded and is in Approved status. No action needed. A nightly process will post the grades to student transcripts.
- Posted: Grades have been successfully assigned, Approved and Posted to student transcripts.

NOTES:
- When grades are in Approved status they cannot be changed. You must move the status back into Not Reviewed to make any changes. See the Changing Grades section below.
- Students will not see their grades until the Registrar's Office posts them to the student record. During the final grading period of a term, grades will post automatically at 6:00 a.m., 12:00 p.m., 6:00 p.m., and 12:00 a.m. All other times during a term, Summer or Winterim, grades are posted every evening at approximately 6:00 p.m.
- At this time, CampS will not email faculty when grades have been successfully submitted.
Please refer to the grade statuses above.
Changing Grades
If after setting the Approval Status to Approved you realize a student has an incorrect grade, it can be changed.
- If the Registrar's Office has not yet posted the grades,
a. From the Approval Status pull-down menu, select Not Reviewed.
You can make changes to student grades.
b. When finished, select Approved from the Approval Status dropdown menu.
c. Click Save.
- If the grades have been posted but the grading deadline has not passed,
a. In the Grade Roster Action box, click Request Grade Change.

b. Change the appropriate student grades.
c. Click Submit.
A message will appear next to the changed grade. The new grade will be posted.
d. When finished, click Return to Grade Roster.
- If the grade deadline has passed, fill out a Grade Change form and return it to the Registrar's Office.
Mass Grade Entry
- Log into CampS using your regular username and password.
- From the top menu bar, click Main Menu.
- Click Self Service.
- Click Faculty Center.
- Click Mass Grade Entry.
- Select the Term, Grade Roster Type, and Class from the pull-down menu.
- Paste data from your spreadsheet in the window provided. Data should be formatted as follows with one row per student:
- First column - ID number or username
- Second column - grade
- Third column (optional) - last attended date for "XF" grade, formatted mm/dd/yyyy
- You can paste XF grades in without a last date attended, but if you do so, you will need to provide a last date attended later in the process.
- The columns can be separated by tabs, commas, or spaces.
- Click Submit. If you receive an error saying a student has withdrawn from the class, you can copy the ID and use [Control + F] to find the student in your list to remove that row.
- After clicking Submit, the window will display the full class grade roster for you to review.
- Grade input represents the grade you submitted via mass grade entry.
- Previous grade indicates any grade entered prior to the mass grade entry.
- Click Save to send the grades to the grade roster.
- From the top menu bar, click Main Menu.
- Click Self Service.
- Click Faculty Center.
- Click My Schedule.
- Click on the Grade Roster
 icon to the left of the class you wish to work on. Review the grades for accuracy.
- Submit grades by changing the Approval Status pull-down menu to Approved.
- Click Save.
NOTE: If it is necessary to resubmit grades, you can override previous grades using the mass grade entry process as long as you have not yet changed the approval status to Approved.